Aquarium CO2 Installation & Monitoring Guide
Aquarium CO2 Installation & Monitoring Guide
A well-designed aquarium CO2 system is one of the most effective tools for improving aquatic plant growth, coloration, and overall planted aquarium health. Whether you are installing your first planted aquarium CO2 system or refining an advanced aquascape, understanding how CO2 equipment functions and how to monitor it correctly is essential for long-term stability and success.
Pressurized CO2 systems are widely used in planted aquariums and can be operated safely when installed, monitored, and adjusted carefully.
This guide covers the fundamentals of aquarium CO2 installation, regulator setup, CO2 monitoring, drop checker usage, best practices, and common mistakes to avoid when operating a planted aquarium CO2 system.
Jump to a Section
- Understanding the Aquarium CO2 System
- GLA CO2 Installation Videos
- CO2 Regulator Installation & Refill Tips
- Understanding the CO2 Drop Checker
- How to Install a CO2 Drop Checker
- Understanding CO2 Drop Checker Colors
- Best Practices for Stable Aquarium CO2
- Common CO2 Mistakes to Avoid
- Recommended GLA CO2 Equipment
- Aquarium CO2 FAQs
Understanding the Aquarium CO2 System
Aquatic plants use carbon dioxide (CO2) during photosynthesis to produce energy and grow. In many planted aquariums, naturally occurring CO2 levels are limited and may restrict plant growth, coloration, and overall aquarium performance. A pressurized aquarium CO2 system provides a stable and controlled source of carbon dioxide to support healthy aquatic plant growth.
A complete aquarium CO2 system typically includes several key components working together to safely regulate, deliver, and monitor CO2 inside the aquarium.
Main Components of an Aquarium CO2 System
- CO2 Cylinder: Stores compressed carbon dioxide under high pressure.
- CO2 Regulator: Reduces the extremely high pressure inside the cylinder to a controlled working pressure suitable for aquarium use.
- Solenoid Valve: Allows automated control of CO2 injection, commonly connected to a timer.
- Needle Valve: Provides fine adjustment of CO2 flow rate into the aquarium.
- Bubble Counter: Allows visual monitoring of CO2 injection rate.
- Check Valve: Helps prevent aquarium water from backflowing toward the regulator.
- CO2 Tubing: Carries CO2 from the regulator to the diffuser or reactor.
- Diffuser or Reactor: Dissolves CO2 into the aquarium water.
- CO2 Drop Checker: Provides a visual reference for approximate aquarium CO2 concentration.
Why CO2 Stability Matters
In planted aquariums, stability and consistency are often more important than maximizing CO2 levels. Sudden fluctuations in CO2 concentration can stress livestock and contribute to unstable aquarium conditions, while stable and properly distributed CO2 helps promote healthy plant growth and long-term aquarium balance.
Proper circulation, consistent injection timing, appropriate diffusion, and careful observation all play important roles in maintaining stable aquarium CO2 levels.
Single Stage vs Dual Stage CO2 Regulators
Single stage regulators reduce cylinder pressure in a single pressure reduction stage and are commonly used for smaller or simpler planted aquarium setups.
Dual stage regulators reduce pressure in two stages, helping maintain more stable working pressure as the CO2 cylinder empties. This design helps reduce pressure fluctuations and improves long-term stability in planted aquarium CO2 systems.
For many aquascapers, dual stage regulators provide an added level of consistency and control, particularly in higher-demand planted aquariums or multi-aquarium systems.
GLA CO2 Installation Videos
The following installation videos provide step-by-step guidance for setting up and operating GLA aquarium CO2 regulators, modular manifolds, and CO2 monitoring equipment.
Whether you are installing your first planted aquarium CO2 system or expanding an advanced multi-aquarium setup, these videos cover proper installation techniques, equipment configuration, and general best practices for long-term reliability and stable CO2 performance.
How to Install: GLA GRO Aquarium CO2 Regulator
The GLA GRO is a compact single stage CO2 regulator designed for reliable CO2 delivery in single aquarium installations and planted aquarium systems.
How to Install: GLA PRO-DS Dual Stage CO2 Regulator (Modular)
The GLA PRO-DS modular dual stage regulator system is designed for high-performance planted aquariums, advanced aquascapes, and expandable multi-aquarium CO2 distribution.
How to Assemble & Install: GLA DS-Mini Dual Stage CO2 Regulator (Modular)
The GLA DS-Mini combines compact dual stage performance with modular expandability for planted aquariums requiring stable CO2 delivery in a smaller footprint.
How to Install GLA Modular Manifold Blocks
GLA modular manifold blocks allow compatible GLA regulators to distribute CO2 independently to multiple planted aquariums from a single CO2 cylinder and regulator system.
For additional aquarium CO2 installation, maintenance, and educational videos, visit the GLA YouTube Channel.
CO2 Regulator Installation & Refill Best Practices
Proper installation and maintenance practices play an important role in the long-term reliability and performance of aquarium CO2 equipment. Following these recommendations can help reduce leaks, improve consistency, and extend the operational life of your planted aquarium CO2 system.
Before Removing the Regulator from the CO2 Cylinder
Before disconnecting your regulator for a CO2 refill, fully relieve the working pressure from the low pressure side of the regulator. This helps reduce unnecessary stress on gauges and internal components during removal and reinstallation.
Vent the CO2 Cylinder Briefly After Refilling
After filling or refilling a CO2 cylinder, briefly vent the cylinder valve for approximately 1–2 seconds before installing the regulator. This helps remove potential debris or contaminants that may be present inside the cylinder valve.
Preventing debris from entering the regulator or solenoid may help improve long-term reliability and reduce contamination-related issues.
Allow the Cylinder to Reach Room Temperature
After refilling, allow the CO2 cylinder to return to ambient room temperature before reinstalling the regulator. This helps stabilize cylinder pressure and allows more accurate pressure readings.
Always Use a Proper CO2 Tank Seal
Install a fresh CO2 tank seal between the regulator and cylinder connection during installation. Worn or damaged seals are one of the most common causes of CO2 leaks.
GLA recommends replacing the CO2 seal during cylinder refills and inspecting the seal regularly for wear or deformation.
Properly Tighten the Regulator Connection
When installing the regulator onto the CO2 cylinder, securely tighten the connection using an appropriate wrench or CO2 installation tool to ensure a proper seal and help prevent leaks.
Avoid excessive force or overtightening beyond what is necessary to achieve a secure connection.
Avoid Overtightening Bubble Counters
Bubble counters should only be hand-tightened enough to create a proper seal. Excessive force may damage threads, seals, or other regulator components.
Always Use a Check Valve
A check valve helps prevent aquarium water from backflowing through CO2 tubing toward the regulator and solenoid.
For best protection, install the check valve outside the aquarium and close to the aquarium side of the CO2 tubing system.
Need Assistance?
If you have questions regarding installation, operation, troubleshooting, or maintenance of your GLA CO2 equipment, please contact GLA support before attempting repairs or disassembly.
Improper modification or repair attempts may damage precision regulator components and affect system performance.
Understanding the Aquarium CO2 Drop Checker
The aquarium CO2 drop checker is one of the most widely used tools for visually monitoring dissolved CO2 levels in planted aquariums. When used properly, it provides a simple and effective reference for adjusting CO2 injection and maintaining stable planted aquarium conditions.
A drop checker works by using a small reservoir of indicator solution separated from the aquarium water by an airspace. As CO2 levels inside the aquarium change, carbon dioxide gradually diffuses into or out of the indicator solution until equilibrium develops between the aquarium water, airspace, and indicator solution.
This gradual response causes the indicator solution to change color based on the approximate concentration of dissolved CO2 inside the aquarium.
Why 4 dKH Reference Solution Matters
Accurate drop checker readings depend on using a known carbonate hardness reference solution, commonly 4 dKH, combined with a pH indicator such as Bromothymol Blue.
The use of a known 4 dKH reference solution helps isolate the relationship between pH and dissolved CO2 concentration inside the drop checker. This allows the indicator color to provide a more consistent approximation of aquarium CO2 levels.
Using aquarium water directly inside a drop checker is not recommended because varying aquarium KH, buffering compounds, and water chemistry can affect accuracy and consistency.
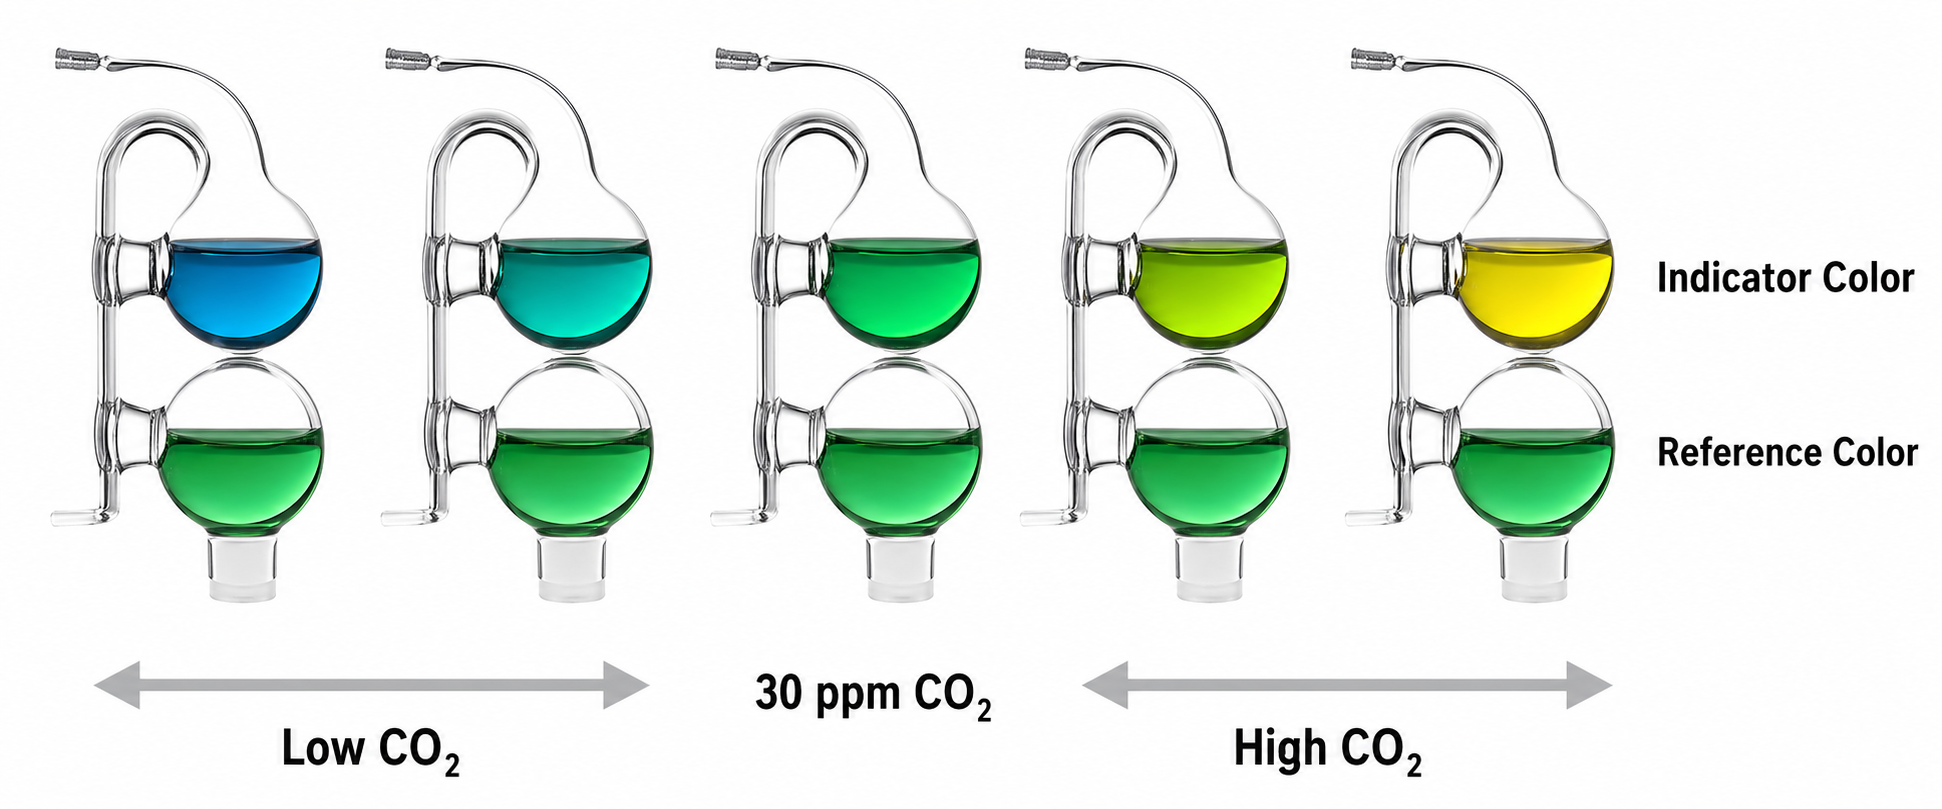
Understanding the Indicator Colors
As dissolved CO2 levels change, the indicator solution shifts color:
- Blue: Lower CO2 concentration
- Green: Approximate target CO2 range for many planted aquariums (~30ppm)
- Yellow: Elevated CO2 concentration
The color transition is gradual and should be interpreted as a general reference rather than an exact laboratory measurement.
Drop Checkers Do Not Display Instant CO2 Levels
One of the most important concepts to understand is that a drop checker does not provide real-time CO2 readings.
Because equilibrium takes time to develop between the aquarium water and indicator solution, most drop checkers respond with an approximate delay of 1–2 hours after CO2 levels change inside the aquarium.
For this reason, sudden adjustments to CO2 injection should be made gradually and evaluated patiently over time rather than continuously changing settings based on immediate color observations.
Proper Placement of a CO2 Drop Checker
Drop checker placement can significantly affect how useful and representative the readings are.
For best results, position the drop checker:
- In an area with moderate circulation
- Away from direct diffuser output or concentrated CO2 streams
- Opposite the primary CO2 injection source when possible
- In a visible location for easy monitoring
Poor circulation or placement directly next to a diffuser may create misleading readings that do not accurately represent overall aquarium CO2 distribution.
How to Install a CO2 Drop Checker
Video: How to Install & Use an Aquarium CO2 Drop Checker
This video demonstrates how to properly prepare, install, and interpret a planted aquarium CO2 drop checker using 4 dKH indicator solution and Bromothymol Blue pH indicator.
Installing a CO2 drop checker is straightforward and typically requires only a few minutes of setup.
Step 1 – Prepare the Indicator Solution
Rinse the drop checker with clean water before use to remove dust or residue.
Fill the reservoir with either:
- Pre-mixed ready-to-use CO2 indicator solution
- 4 dKH reference solution combined with approximately 2–4 drops of Bromothymol Blue pH indicator
The solution should appear transparent blue prior to installation.
Step 2 – Install the Drop Checker Inside the Aquarium
Place the drop checker inside the aquarium with the open side facing downward to maintain the internal airspace required for proper operation.
Install the drop checker in an area with moderate water circulation while avoiding direct diffuser output or stagnant areas of the aquarium.
Step 3 – Allow Time for Equilibrium
After installation, allow approximately 2 hours for the indicator solution to respond to aquarium CO2 levels.
Because drop checkers respond gradually, immediate color changes should not be expected after adjusting CO2 injection rates.
Step 4 – Observe the Indicator Color
Monitor the solution color periodically and make gradual CO2 adjustments as necessary.
- Blue: Increase CO2 injection gradually
- Green: Maintain current CO2 settings
- Yellow: Reduce CO2 injection gradually
Observing the drop checker against a light or white background may improve visibility and color interpretation.
Understanding CO2 Drop Checker Colors
Drop checker colors should always be interpreted as a general visual reference rather than an exact measurement. Aquarium circulation, gas exchange, livestock load, plant density, and aquarium design can all influence ideal CO2 levels.
Blue – Lower CO2 Levels
A blue indicator solution typically suggests lower dissolved CO2 concentration inside the aquarium. In planted aquariums with stronger lighting or demanding aquatic plants, this may indicate that additional CO2 injection is required.
Green – Approximate Target CO2 Range
A green indicator color is commonly associated with an approximate CO2 concentration near 30ppm, which is often considered a useful target range for many planted aquariums.
However, aquarium stability, livestock health, and overall plant response are often more important than chasing an exact numerical CO2 value.
Yellow – Elevated CO2 Levels
A yellow indicator color may suggest elevated dissolved CO2 concentration. Excessive CO2 can stress fish, shrimp, and other livestock, particularly in aquariums with insufficient circulation or gas exchange.
If livestock appear stressed or oxygen deprived, reduce CO2 injection gradually and improve surface movement or circulation if necessary.
Best Practices for Stable Aquarium CO2
In planted aquariums, stable and consistent CO2 delivery is often more important than simply achieving the highest possible CO2 concentration. Consistency helps support healthy plant growth while reducing unnecessary stress on aquarium livestock.
The following best practices can help improve CO2 stability, circulation, and long-term planted aquarium performance.
Make CO2 Adjustments Gradually
Avoid making large or sudden changes to CO2 injection rates. Small adjustments followed by observation over several hours or days are generally more effective and easier to manage safely.
Because drop checkers respond gradually, rapid adjustments based on immediate color changes can lead to unstable conditions.
Start CO2 Before the Photoperiod
Many planted aquarium hobbyists begin CO2 injection approximately 1–2 hours before aquarium lighting turns on. This allows dissolved CO2 levels to stabilize before plants begin active photosynthesis.
CO2 is commonly turned off near the end of the lighting period using a timer connected to the regulator solenoid.
Maintain Good Water Circulation
Efficient circulation plays a major role in distributing dissolved CO2 evenly throughout the aquarium.
Poor circulation may create areas with inconsistent CO2 concentration, resulting in uneven plant growth, algae issues, or misleading drop checker readings.
Proper filter flow, circulation pumps, and diffuser placement can all help improve CO2 distribution.
Observe Plant & Livestock Response
Drop checkers provide a useful visual reference, but aquarium observation remains equally important.
Healthy aquatic plants, stable growth, and normal livestock behavior are often better indicators of long-term CO2 success than chasing an exact numerical value.
Signs of excessive CO2 may include:
- Fish gasping near the surface
- Reduced livestock activity
- Sudden livestock stress after CO2 adjustments
If livestock stress is observed, reduce CO2 injection gradually and improve circulation or surface movement if necessary.
Keep CO2 Equipment Clean & Maintained
Diffusers, reactors, tubing, bubble counters, and check valves should be inspected periodically for buildup, clogging, or wear.
Dirty or partially restricted equipment may reduce CO2 efficiency and contribute to unstable injection rates.
Stability Is More Important Than Bubble Count
Bubble-per-second measurements are only a rough visual reference and can vary significantly depending on aquarium size, diffusion method, circulation, and equipment design.
Rather than focusing on achieving a specific bubble count, focus on maintaining stable CO2 delivery, healthy plant growth, and safe livestock conditions over time.
Common CO2 Mistakes to Avoid
Many planted aquarium CO2 problems are caused by setup inconsistencies, poor circulation, or overly aggressive adjustments rather than the regulator itself. Understanding these common mistakes can help improve long-term aquarium stability and reduce frustration during setup.
Increasing CO2 Too Quickly
One of the most common mistakes is increasing CO2 injection too aggressively in an attempt to force faster plant growth.
Rapid CO2 increases may stress livestock and create unstable aquarium conditions. Gradual adjustments are generally safer and easier to manage.
Placing the Drop Checker Too Close to the Diffuser
Positioning a drop checker directly next to a diffuser or reactor may create artificially high readings that do not accurately represent overall aquarium CO2 distribution.
Install the drop checker in an area with moderate circulation away from concentrated CO2 output.
Poor Aquarium Circulation
Even strong CO2 injection can perform poorly if circulation is inadequate. Dead zones and uneven flow patterns may create inconsistent plant growth and unstable aquarium conditions.
Improving circulation often improves CO2 performance without requiring additional injection.
Ignoring Surface Movement Entirely
While excessive surface agitation may reduce CO2 retention, completely stagnant surface conditions can reduce oxygen exchange and negatively affect livestock health.
Balanced circulation and reasonable surface movement are typically more effective than attempting to eliminate all surface agitation.
Overtightening Bubble Counters or Fittings
Excessive force during installation may damage seals, threads, bubble counters, or regulator components.
CO2 equipment should be tightened securely, but unnecessary force should be avoided.
Using Standard Silicone Airline Tubing
Standard silicone airline tubing is highly permeable to CO2 gas and may allow significant CO2 loss over time.
Aquarium CO2 systems should use CO2-resistant tubing specifically designed for pressurized CO2 applications.
Making Constant CO2 Adjustments
Stable planted aquariums are usually achieved through patience and consistency rather than constant equipment adjustments.
Frequent changes to bubble rate, circulation, photoperiod, or diffusion methods can make it difficult to evaluate overall aquarium stability.
Recommended GLA CO2 Equipment
GLA offers a complete range of aquarium CO2 regulators, CO2 systems, monitoring equipment, and planted aquarium accessories designed for reliable long-term performance.
GLA CO2 Regulators & Systems
- GLA Aquarium CO2 Regulators
- GLA Complete CO2 Systems
- GLA PRO-DS Dual Stage CO2 Systems
- GLA DS-Mini Dual Stage CO2 Systems
- GLA GRO CO2 Systems
CO2 Monitoring Equipment
CO2 Accessories
A properly configured CO2 system combined with stable circulation, careful monitoring, and consistent maintenance can dramatically improve planted aquarium health, growth, and long-term stability.
Whether you are building your first planted aquarium CO2 system or refining an advanced aquascape, understanding the fundamentals of CO2 delivery and monitoring is essential for long-term success.
Frequently Asked Questions About Aquarium CO2 Systems
How long does a CO2 drop checker take to respond?
Most aquarium CO2 drop checkers respond with an approximate delay of 1–2 hours. Because the indicator solution must gradually reach equilibrium with aquarium CO2 levels, drop checkers do not provide real-time readings.
For best results, make CO2 adjustments gradually and allow adequate time before evaluating color changes.
Is green always exactly 30ppm CO2?
A green drop checker color is commonly associated with an approximate CO2 concentration near 30ppm when using a proper 4 dKH reference solution. However, aquarium circulation, livestock load, water chemistry, and gas exchange can all influence actual dissolved CO2 concentration.
Drop checker colors should be used as a general visual reference rather than an exact laboratory measurement.
Where should I place my CO2 drop checker?
For best results, position the drop checker in an area with moderate circulation away from direct diffuser output or concentrated CO2 streams.
Many aquascapers place the drop checker on the opposite side of the aquarium from the diffuser to help evaluate overall CO2 distribution throughout the aquarium.
How many bubbles per second should I use?
Bubble-per-second measurements vary significantly depending on aquarium size, circulation, diffusion method, lighting intensity, and equipment design.
Rather than targeting a specific bubble count, focus on stable CO2 delivery, healthy plant growth, and livestock behavior while using a drop checker as a general monitoring reference.
Can too much CO2 harm fish or shrimp?
Yes. Excessive dissolved CO2 concentration may stress fish, shrimp, and other aquarium livestock, particularly when circulation or oxygen exchange is insufficient.
Signs of excessive CO2 may include gasping near the surface, lethargy, or unusual livestock behavior. If this occurs, reduce CO2 injection gradually and improve circulation or surface movement if necessary.
Do I need a dual stage CO2 regulator?
Single stage regulators are commonly used successfully in planted aquariums, particularly in smaller or simpler setups.
Dual stage regulators provide additional pressure stability as the CO2 cylinder empties and are often preferred for advanced planted aquariums, larger systems, or multi-aquarium installations where long-term consistency is especially important.
Learn more about: GLA PRO-DS Dual Stage CO2 Systems and GLA DS-Mini Dual Stage CO2 Systems.
Why is my drop checker staying blue?
A blue drop checker may indicate insufficient CO2 injection, poor circulation, improper drop checker placement, insufficient equilibration time, or incorrect indicator solution preparation.
Allow approximately 2 hours for color stabilization after adjustments and verify that the drop checker is installed in an area with moderate circulation.
View: Aquarium CO2 Drop Checkers and 4 dKH CO2 Indicator Solution.
Why should I use CO2-resistant tubing instead of standard airline tubing?
Standard silicone airline tubing is highly permeable to CO2 gas and may allow significant CO2 loss over time.
CO2-resistant tubing is specifically designed for pressurized aquarium CO2 systems and helps improve efficiency, consistency, and long-term performance.
View: GLA CO2-Resistant Tubing.
Recent Posts
-
Nature Aquarium Dry Fertilizer Dosing Guide, Dosing Charts & Calculator, & DIY Nutrient Strategies – PPS-Pro & Estimative Index (EI) Methods
Nature Aquarium Dry Fertilizer Dosing Guide, Dosing Charts & Calculator, & DIY Nutrient Strategies
-
GLA Nectar Liquid Fertilizers – A Comprehensive Guide and Dosing Strategies
Achieving a thriving, beautifully planted aquarium requires more than just adding water and light; i
-
Aquarium CO2 Installation & Monitoring Guide
Aquarium CO2 Installation & Monitoring Guide A well-designed aquarium CO2 system is one of the most